|
Transparent Text Effect
Today, we are going to create transparent text effect tutorial in the photoshop. It is a creativity of the style of typing and it looks the text stand out from the background. Generally the text hides the background area so it affects the design visibility. If there is no good place of text in the design so you need to create transparent text to show the background as well.
Creating transparent text in the Photoshop is very easy because it can be created by the help different technique. We will discuss all the technique and create the transparent text one by one in this tutorial.
This is a very basic tutorial, if you have a minimal knowledge of the Photoshop you can do it easily so lets start.
Frame Transparent Text
First I am going to create a frame transparent text in the Photoshop, it is just like a text in the form of the frame, it can be move anywhere without disturbing the background visibility.
Open a picture where you have to create transparent text, select Text Tool (T key) with adjusted tools property then type any text as given below.
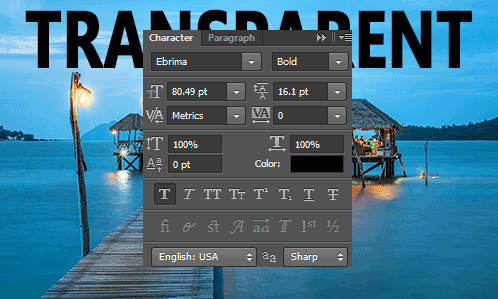
Now we have to create selection so hold CTR key and mouse click on the text layer's thumb, as showing by white arrow in the below picture. After text selection unhide the layer by click on the eye of relative text layer, go to Edit menu and choose Stroke option then apply same settings with color as given below picture.
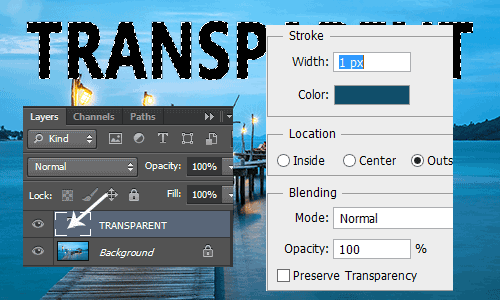
In this step you have to create a rectangle selection by using Rectangular Marquee Tool (M key) around the text to look like a frame, use upper step to convert the selection into the line.
This is completed.

Piece Transparent Text
The second method is piece transparent text effect in the Photoshop; we will convert a cut a piece of the picture then convert it into the as transparent, it can't be mover anywhere on the picture.
First you need to select an area where you want to make transparent text on the picture, type the text with any property and color as done upper step.

Now make copy the selected area by go to Edit menu and choose Copy Merged then press Ctrl + V at the same place. Your cut of piece will be invisible as natural background picture so need to work more to visible it.
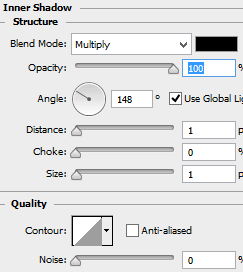
Follow Layer Menu > Layer Style and choose Inner Shadow, put and adjust all these settings with black color. Your text will visible because this option helps to visible a black line inside the text.
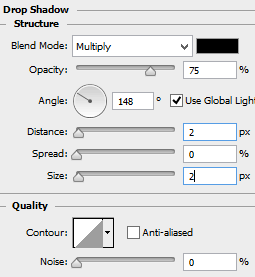
You text is completed yet so you have to apply one more layer style that is drop shadow. Go to Layer menu > Layer style and choose Drop Shadow. Put right value and adjust the settings with black color as I have done here.
Your text is completed.

Emboss Transparent Text
The third method is Emboss transparent text effect in the Photoshop, it is very different and easy method to convert any text into the emboss text and it can be mover anywhere without disturbing the background visibility.
Pick a right spot and execute this effect, Select Text Tool (T key) and type text on the picture with any text property with color. In the next step you need not to make text selection so feel free, we will apply direct layer style on the text.
In this step you have to make invisible to hide text's color so change the "Fill" of the layer 100% to 0% as showing by red spot.

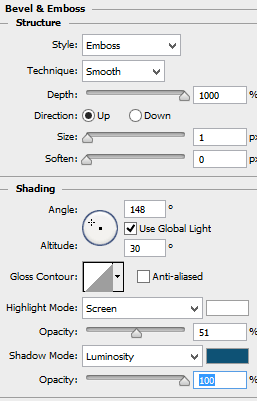
Now Follow Layer Menu > Layer Style and choose Bevel & Emboss, it will convert your text into the emboss style, you have to adjust all these settings with color as given below picture.
This is the final result.

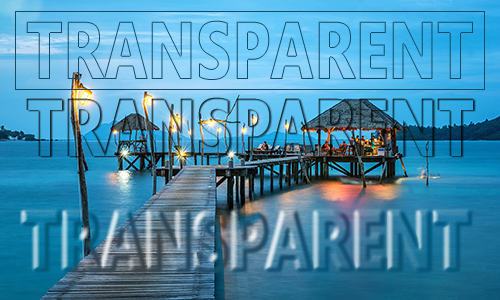
All the transparent effect on the one picture.
Santosh Kumar
This is santosh kumar living in New Delhi (India) and love to work as a Web & Graphic Designing. I like to create sketch, background, illustration and vector graphics. Tutorialbunch.com is a very good place where I express my creativity.
|