|
Create Magma Text
Hi
You are going to learn how to create a magma text effect in photoshop, I have
used a simple technique and fully described step by step in this example. You
have to follow them and try to draw yourself so start let's start.
Start with a new document and put size as you need, select Horizontal Type
Tool (T key0 and make formatting then type any text on the document as you want.

Convert the text into path by following this path (Layer > Type >
Convert work Path). Now you have to insert a little dots inside the text so
change the foreground and background color.

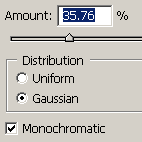
Now apply noise inside the text by following this path (Filter menu >
Noise > Add Noise), a window will come on and make adjustment as given below
picture.
The text should be look like this.

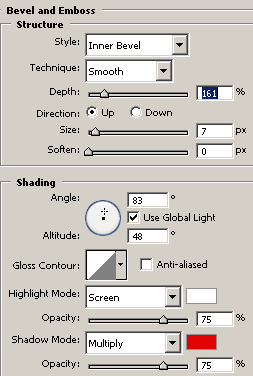
Apply bevel look on the text by following this path (Layer menu > Layer
Style > Bevel and Emboss), change the colors and angle then make adjustment
another settings as given below.
Apply color on the whole text to get a different look, follow this path
(Layer menu > Layer Style > Color Overlay), choose light yellow color and
change blend mode as given here.

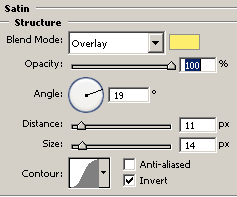
Now apply satin on the whole text by following this path (Layer menu >
Layer Style > Satin), choose yellow color and change the angle then make
another adjustment as done below.
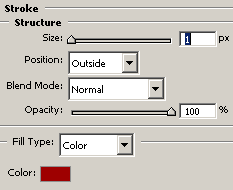
Finally apply stroke around the text, follow this path (Layer menu > Layer
Style > Stroke), choose color and adjust all the settings as done below
picture.
The magma text is completed.

It is your work for practice, apply text shadow and use it in your
advertisement project.

Santosh Kumar
This is santosh kumar living in New Delhi (India) and love to work as a Web & Graphic Designing. I like to create sketch, background, illustration and vector graphics. Tutorialbunch.com is a very good place where I express my creativity.
|