|
Gradient Text Effect
It is enough and tired work to apply solid color so I am going to apply multi colors. I am going to share a beautiful gradient text effect tutorial in photoshop. It can be done by using some different ways but here I will teach you most effective ways to create it. It will be created by using some layer styles so let's start without wasting time.
In the first step you have to take and document with appropriate size, press Ctrl + N key and choose "web" for "preset" section then adjust size as required.
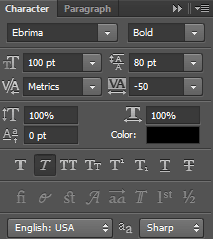
Select Text Tool from the toolbar and press CTR + T key then adjust the property of the tool like font, format and alignment. Type any text which you want to create as a gradient text. No matter of text color at this point, I will convert it as gradient color format.

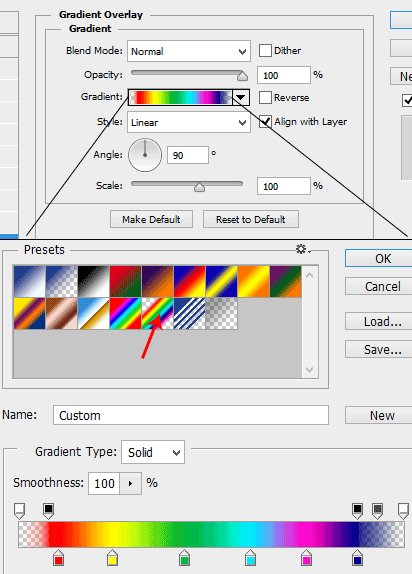
Now it is time to apply gradient overlay layer style to replace color to your custom gradient of you choice. There is no another way to fill color inside the text so follow the Layer menu > Layer Style and choose Gradient Overlay.
In the Opened pop up, you can see many options to modify. Click on the Gradient section and you get another pop up then select provided gradient in the Preset section, I have indicated it by red arrow.
You can also apply your custom gradient color by click on the "Stop" then pick your design color and can be adjust the position of the stop to get batter result.
Your text will be fully gradient colored. I am going to make it stylish and beautiful, it will provide the lighting effect inside the text.
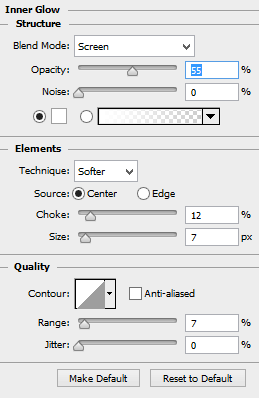
Follow Layer Menu > Layer Style and choose Inner Glow, you just have to adjust the same setting of blend mode, color, opacity, source and etc.
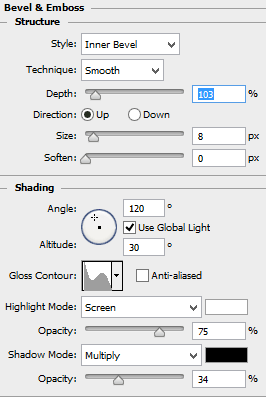
Now apply Bevel & Emboss layer style to create a shape of the text, you can see the text into a shape to look more attractive.
Follow Layer Menu > Layer Style and choose Bevel & Emboss, a pop up will appear and you have to make all these settings of value and colors as given here.
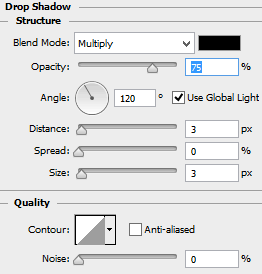
Now I am going to apply final step to change the vision of the text like laying on the surface, follow Layer Menu > Layer Style and choose Drop Shadow then change all these settings as given below to get the batter result.
This is the final result, enjoy.

Santosh Kumar
This is santosh kumar living in New Delhi (India) and love to work as a Web & Graphic Designing. I like to create sketch, background, illustration and vector graphics. Tutorialbunch.com is a very good place where I express my creativity.
|