|
Hexagon Emboss Texture
I am here with a new tutorial and it will help you to create a hexagon embossed texture effect in the photoshop; you have to just follow some simple steps with carefully. I have used some tools of photoshop these are ' "filter", "Layer blending mode", "Layer Style" '. It will used to apply as a background in any project so start now.
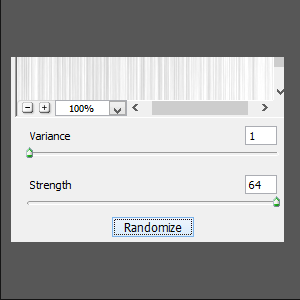
First take a new document with any size as you need, apply "#232323" color by paint bucket tool (G key). Take a new layer and fill color "#575757", go to filter menu > Render > Fiber then change the setting and apply till "Randomize" button below picture.
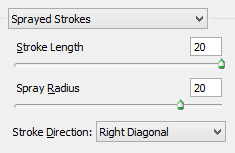
Now change the foreground and background color (Black & White), take a new layer and apply cloud effect on by go to filter menu > Render > Clouds. Your one effect is completed and need to apply another one, go to filter menu and choose filter gallery then select "Sprayed Strokes" and adjust the same settings as here.
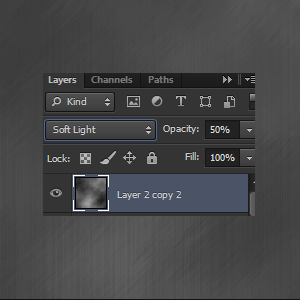
Now change the layer's blending mode "Normal" to "Soft Light" and reduce the opacity "100%" to "50%", it will help to mash the both filter effect as done the below picture.
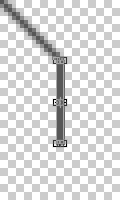
In this step I will prepare hexagon pattern to apply on the document, take a new layer with height "200px", Width "120px" with transparent background. Select Line Tool (U key) with any color and draw in the middle of the document. Make duplicate line layer and press Ctrl + T key then rotate and put on the left top of the line as done below picture.
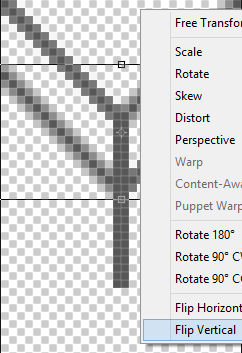
Select moved line and make duplicate layer and press Ctrl + T key then right click and choose "Flip Horizontal". Put on the right top of the line and draw a straight a short line, select both line and make duplicate layer then right click and choose "Flip Vertical", put on the bottom of the line.
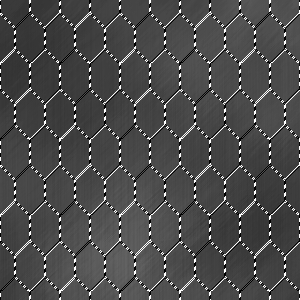
You should have this picture.

Select all these line and make them merge by right click and choose "Merged Layer", come back on main document, take a new layer and press (Shift + F5) then select pattern and apply. Click on the layer thumb to make selection and press "Del" key on every layer of effect.
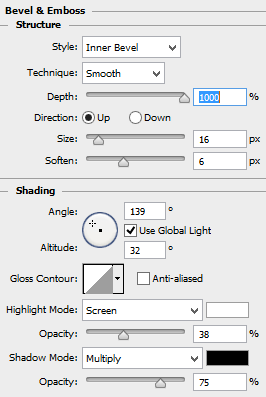
Come to clouds effect layer and apply "Emboss" Layer style, go to Layer menu > Layer Style > Bevel & Emboss and make all these setting as done below picture.
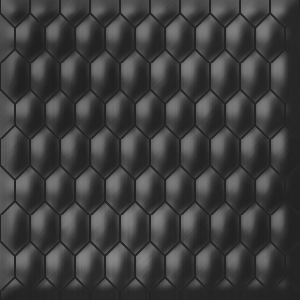
This is the Final Result.
Santosh Kumar
This is santosh kumar living in New Delhi (India) and love to work as a Web & Graphic Designing. I like to create sketch, background, illustration and vector graphics. Tutorialbunch.com is a very good place where I express my creativity.
|